I am excited to share with you a new pattern – available for FREE right here on my blog.
Want to save this Baby Chick Crochet Pattern for later? Save this image pin to your favorite Pinterest board so you can find it later easily.

Design Inspiration
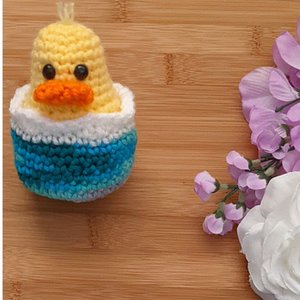
When I think of Spring, I think of new baby chicks being born. This year I am working on farm animals for most of my designs. So of course, I needed baby chick, and I will be designing a chicken later in the year. I wanted to give you a quick-win crochet project.
This pattern is an easy and quick project. It can be crocheted in less than 2 hours. It only has one part that is sewn on and that is the beak. This pattern is perfect for the beginner in mind.
Here is a story about Suzy the Baby Chick by my 8 year old daughter Bella:
“She loves to cuddle and play. She will make you happy when you are sad by giving you a hug. She is so sweet. That’s Suzy the baby chick for you.”
Materials:
- 50 yards, Worsted Size 4, I Love This Yarn Solid 7 oz/199 grams, 355 yards/320 meters in Yellow
- 15 yards, Worsted Size 4, I Love This Yarn Solid 7 oz/199 grams, 355 yards/320 meters in Orange
- 50 yards, Worsted Size 4, I Love This Yarn Print 5 oz/142 grams, 252 yards/230 meters in Shocking Violet
- 20 yards, Worsted Size 4, I Love This Yarn Solid 7 oz/199 grams, 355 yards/320 meters in White
- HOOK: G/6 4.0 mm
- Polyfil
- Yarn Needle to weave in ends and sew pieces together
- Stitch markers
- Scissors
- Safety Eyes (optional)
Experience Level: Beginner
Gauge: N/A
Size:
5.5” x 4” x 2” approximately
Pattern Key:
SC – Single Crochet
Sc2tog – Single Crochet Decrease
Sl st – Slip Stitch
FO – Finish Off
St/sts – Stitch/Stitches
Ch – Chain
Rnd(s) – Round(s)
MC – Magic Circle
Color A – Yellow
Color B – Orange
Color C – Shocking Violet
Color D – White
Notes:
- Read through the entire pattern first.
- Head/body and Beak are done in continuous Rounds so do not join. Use stitch markers to know where your first stitch in the round is.
- Egg Shell is worked in joined rounds.
- Sl st does not count as a stitch throughout the pattern.
- Repeat stitches between * and * around.
- Alternative to MC – Ch 2; work number of SC specified in the 2nd chain from the hook.

Pattern Instructions:
Head/Body: Worked in Continuous Rounds
Rnd 1: Using Color A, create MC; 6 SC in MC. (6 sts)
Rnd 2: 2 SC in each st around. (12 sts)
Rnd 3: *SC in the next st; 2 SC in the next st.* Repeat around. (18 sts)
Rnds 4-9: SC in each st around. (18 sts) (6 total rounds)
****INSERT SAFETY EYES BETWEEN ROUNDS 6 & 7 WITH 2 STS BETWEEN THE EYES.****
Rnd 10: *SC in the next 2 sts; 2 SC in the next st.* Repeat around. (24 sts)
Rnd 11: *SC in the next 3 sts; 2 SC in the next st.* Repeat around. (30 sts)
Rnds 12-15: SC in each st around. (30 sts) (4 total rounds)
****START STUFFING*****
Rnd 16: *SC in the next 3 sts; sc2tog.* Repeat around. (24 sts)
Rnd 17: SC in each st around. (24 sts)
****CONTINUE STUFFING****
Rnd 18: *SC in the next 2 sts; sc2tog.* Repeat around. (18 sts)
Rnd 19: SC in each st around. (18 sts)
Rnd 20: *SC in the next st; sc2tog.* Repeat around. (12 sts)
****FINISH STUFFING****
Rnd 21: Sc2tog around. (6 sts)
FO with a 4” tail. Using the tail, weave in and out of the front loops to close the hole. Hide the tail.
Beak: Worked in Continuous Rounds
Rnd 1: Using Color B, ch 4; 2 SC in the 2nd chain from the hook; SC in the next ch; 2 SC in the last ch. Turn work slightly, and work in the opposite side of beginning chain. 2 SC the same ch; SC in the next ch; 2 SC in the last ch. (10 sts)
Rnd 2: SC in each st around. Sl st to the first st. (10 sts)
FO with a 6” tail to sew to head/body. DO NOT stuff. Fold flat and sew closed.
Egg: Worked in Joined Rounds
Rnd 1: Using Color C, create MC; 6 SC in MC; sl st to the first st. (6 sts)
Rnd 2: Ch 1; 2 SC in each st around; sl st to the first st. (12 sts)
Rnd 3: Ch 1; *SC in the next st; 2 SC in the next st.* Repeat around; sl st to the first st. (18 sts)
Rnd 4: Ch 1; *SC in the next 2 sts; 2 SC in the next st.* Repeat around; sl st to the first st. (24 sts)
Rnd 5: Ch 1; *SC in the next 3 sts; 2 SC in the next st.* Repeat around; sl st to the first st. (30 sts)
Rnd 6: Ch 1; *SC in the next 4 sts; 2 SC in the next st.* Repeat around; sl st to the first st. (36 sts)
Rnds 7-8: ch 1; SC in each st around; sl st to the first st. (36 sts) (2 total rounds)
Rnd 9: Ch 1; *SC in the next 4 sts; sc2tog.* Repeat around; sl st to the first st. (30 sts)
Rnds 10-11: Ch 1; SC in each st around changing to Color D in the last st and FO Color C; sl st to the first st. (30 sts) (2 total rounds)
Rnd 12: Ch 1; SC in each st around; sl st to the first st. (30 sts)
Rnd 13: Ch 1; *SC in the next 2 sts; DC in the next 2 sts; sl st in the next 2 sts.* Repeat around; sl st to the first st. (30 sts)
Rnd 14: sl st in each st around.
FO and weave in ends.
Assembly:
Sew the beak to round 7 of the head/body.
I choose to have the chick and egg separately and not sew the egg onto the chick for more imaginative play.
Congrats! You have made an adorable chick amigurumi.
Original Design by Christina Ryan
Thank you for choosing Creative Snugglies Designs. You are welcome to use this pattern to create and sell items created by you. If you sell your items online, please include a link back to my shop. This pattern and the photographs, that I provided for your convenience, are my intellectual property. They are protected by copyright and may not be used in any form. You may not share, copy, reproduce, sell, or alter this pattern and claim it as your own.
I would LOVE to see your creations so please share your finished work! I have included links to my social media and store pages. When you share your creations, please hashtag with #CreativeSnuggliesDesigns or #CreativeSnugglies and tag me so I can find your work! Please do not hesitate to contact me with any questions at CreativeSnugglies@gmail.com and I will help you with the pattern.
Join my email list in order to stay up to date on all pattern releases, CALs, etc.
Thank you to my Testers!
I want to thank my testers Debra and Kami! I love the different colors they chose. Here are their pictures below.

I hope you enjoy this sweet pattern! If you make it, please tag me on Facebook @creativesnuggliesdesigns or Instagram @creativesnugglies.
Happy Crocheting!
Christina