I am so excited to share with you a brand new amigurumi pattern. Save this pin for later.

Design Inspiration
I wanted to do something different this time than my usual designs. I decided to do a sunflower. Then my friend, Erin @Juniperandoakes, is hosting this Plants With Yarn Blog Hop. I knew it would be perfect for this blog hop. This pattern was featured in the Plants With Yarn Blog Hop on June 27, 2022
This adorable (text-only) crochet pattern is available for a free crochet pattern right here on my blog. You can purchase the Ad-free PDF version by clicking the button below.
Materials
- 50 yards, Worsted Size 4, I Love This Yarn Solids 7 oz/199 grams, 355 yards/320 meters in Royal
- 120 yards, Worsted Size 4, I Love This Yarn Solids 7 oz/199 grams, 355 yards/320 meters in Brown
- 90 yards, Worsted Size 4, I Love This Yarn Solids 7 oz/199 grams, 355 yards/320 meters in Yellow
- 30 yards, Worsted Size 4, I Love This Yarn Solids 7 oz/199 grams, 355 yards/320 meters in Mid Green
- Hook: G/6 4.0 mm
- Polyfil
- Yarn Needle
- Stitch Markers
Experience Level: Beginner
Gauge: N/A
Size:
14” x 9” x 3.5” approximately
Pattern Key:
SC – Single Crochet
Sc2tog – Single Crochet Decrease
Sl st – Slip Stitch
FO – Finish Off
St/Sts – Stitch/Stitches
Ch – Chain
Rnd(s) – Round(s)
MC – Magic Circle
BLO – Back Loop Only
Color A – Royal
Color B – Brown
Color C – Yellow
Color D – Mid Green
Notes:
- Read the entire pattern first.
- All parts are done in continuous rounds. DO NOT join while making the parts. Use stitch markers to know where your first stitch in the round is.
- Sl st does not count as a stitch throughout the pattern.
- Repeat stitches between * and *.
- Alternative to MC – Ch 2; work number of SC specified in the 2nd chain from the hook.

Pattern Instructions:
Pot: Worked in Continuous Rounds
Rnd 1: Using Color A, create MC; 6 SC in MC. (6 sts)
Rnd 2: 2 SC in each st around. (12 sts)
Rnd 3: *SC in the next st; 2 SC in the next st.* Repeat around. (18 sts)
Rnd 4: *SC in each of the next 2 sts; 2 SC in the next st.* Repeat around. (24 sts)
Rnds 5-8: SC in each st around. (24 sts) (4 total rounds)
Rnd 9: *SC in each of the next 3 sts; 2 SC in the next st.* Repeat around. (30 sts)
Rnd 10: *SC in each of the next 4 sts; 2 SC in the next st.* Repeat around. (36 sts)
Rnds 11-12: SC in each st around. (36 sts) (2 total rounds)
Rnd 13: SC in each st BLO around. (36 sts)
Rnds 14-15: SC in each st around; sl st to the next st to FO. (36 sts) (2 total rounds)
Weave in ends.
Soil: Worked in Continuous Rounds
Rnd 1: Using Color B, create MC; 6 SC in MC. (6 sts)
Rnd 2: 2 SC in each st around. (12 sts)
Rnd 3: *SC in the next st; 2 SC in the next st.* Repeat around. (18 sts)
Rnd 4: *SC in each of the next 2 sts; 2 SC in the next st.* Repeat around. (24 sts)
Rnd 5: *SC in each of the next 3 sts; 2 SC in the next st.* Repeat around. (30 sts)
Rnd 6: *SC in each of the next 4 sts; 2 SC in the next st.* Repeat around. (36 sts)
Rnd 7: SC in each st around. (36 sts)
Rnd 8: Lining up the stitches with the top of the pot, SC in the back loop only of the last round of the soil and the front loop only of the pot. Stuff inside the pot about half way through continuing to stuff before you finish going all the way around.
FO and weave in the ends.
Flower Center – Make 2 – Worked in Continuous Rounds
Rnd 1: Using Color B, create MC; 6 SC in MC. (6 sts)
Rnd 2: 2 SC in each st around. (12 sts)
Rnd 3: *SC in the next st; 2 SC in the next st.* Repeat around. (18 sts)
Rnd 4: *SC in the next 2 sts; 2 SC in the next st.* Repeat around. (24 sts)
Rnd 5: *SC in the next 3 sts; 2 SC in the next st.* Repeat around. (30 sts)
Rnd 6: *SC in the next 4 sts; 2 SC in the next st.* Repeat around. (36 sts)
Rnd 7: SC in each st around. (36 sts)
FO first one with a sl st to the next st.
Rnd 8: With the second one, DON’T FO, line up the wrong sides facing each other, and SC in each st through both pieces around to join stuffing about half way through and continuing to stuff before fully joining. Sl st to the first st to FO. Weave in ends.
Petals: Make 5 – Worked in Continuous Rounds
Rnd 1: Using Color C, create MC; 6 SC in MC. (6 sts)
Rnd 2: 2 SC in each st around. (12 sts)
Rnds 3-10: SC in each st around. (12 sts) (8 total rounds)
FO with 6” tail. Lightly Stuff. Fold flat and using tail sew ends closed.
Stem – Worked in Continuous Rounds
Rnd 1: Using Color D, create MC; 6 SC in MC. (6 sts)
Rnds 2-18: SC in each st around stuffing as you crochet; sl st to the next st to FO with a 6” tail. (17 total rounds)
Assembly:
Attach the Petals to the flower right behind the join of the 2 flower pieces with approximately 3 sts between each petal.
Attach the stem to the back of the Sunflower and also in the center of Rounds 1 and 2 of the soil.
Congrats you have made a beautiful sunflower amigurumi. Save this pin for later.
Testers
I want to thank my testers Sonya and my tester Ravelry user Clubnyz for testing my pattern.

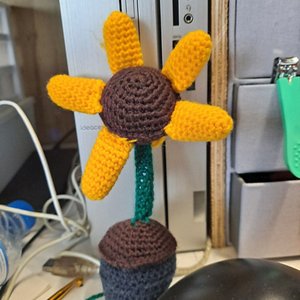
Tester Photos
Thank you for stopping by and Happy Crocheting!
Christina